Wednesday, October 31, 2012
Trick or Treat & Flying Things!
Last year for Halloween I decided to do something risky. I wanted to hand out a healthier alternative to candy... something that was more in sync with what I encourage every day to the kids and parents in my classes. First thought: carrot sticks. Second thought: my house might get toilet papered. Final decision: a big bowl full of airplanes, flying disc and toys to play with. I can't tell you how cool it was to see the kids run back to their parents jumping up and down telling them they got a plane to play with!
Oriental Trading sells a box of 72 Gliders for $12. Here's the link!
Note: These items worked well for my neighborhood because all the kids are preschool and kindergarten age. For the older ones, jump ropes, fake tattoos, punching balloons, or kazoos might work too! Now that I have a new nickname with the kids I'm going to have to try Yo-Yo's next year!
Thursday, October 18, 2012
Snack time
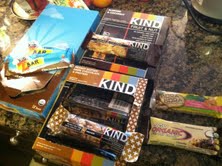
Finding a healthy snack can sometimes be a challenge, especially on the go, in the car, or after you exercise! These are a few of my favorite mini meals for on the move that I've shared with my private clients I train. Justin's peanut butter & honey and also Justin's almond butter & chocolate are a delicious protein packed, easy to slurp up, mini treat. Another favorite are the ZBARS (chocolate brownie) made by CLIFF and KIND bars (my favorites are coconut, and the peanut chocolate). Two others are called RAW ORGANIC FOOD BAR (of course... I like the one with the chocolate chips!) and BORA BORA (apricot quinoa). If you find bars that are USDA organic, then they are also GMO free! I’m also a big fan of making my own food bars – more details coming soon! Happy healthy eating!
~ Yvonne
Thursday, September 13, 2012
My very first 5K
![]() |
| Running Color Me Rad |
- Get your child excited about your goal. The race that I was practicing for was called Color Me Rad. I showed Rowan pictures of the race that I was going to run. The participants were intermittently sprayed with colors, so it looked joyous and exciting. We would pretend that we were about to get splashed with colors as we were training. It helped her visualize the race. And i think it made her supportive of my goal.
- Give them something to do. I would often bring books, stickers, toys, or crayons on the run so she would have options. I even found her a cheap MP3 player and she listened to a Curious George audio book while I ran. Scavenger hunts are great, too. I like to run on the Delaware River canal path, so there are always locks and ducks and bridges and herons to look out for.
- Reward them! This is key. I would often plan my run so we would end up at a park. She knew that she would get some good mom time in at the end of each run & that helped her to allow me the time I needed to get a good run in. Sometimes we would pack a picnic. Sometimes we would bring a few pieces of chalk. But she knew that if she cooperated, we would be doing something fun for both of us at the end. If you don't have a park that you can run to, try to end at a friends house, a coffee shop, or any other place that will be fun for them.
- Let them get out of the stroller. Rowan has always been an active child. She loves being a part of what's going on. And that was by far my biggest challenge in meeting this goal. Some days it seemed that no matter what I brought to entertain her, we would be 5 minutes into the run and she'd be crying to be let out of the stroller. I learned pretty quickly that sometimes you just have to let her run with you. Sure, she's not going to be able to run as far as I am (although, she's really quick. Sometimes she runs faster than me). But she's learning that running & exercise is fun. 'Race' you child to a tree or a bridge. Or run to each other and see who gets there faster. These little breaks in your routine can be rejuvenating. They can make you more ready & eager for your run the next day. And they'll definitely strengthen the bond between you and your child. After all, the family who plays together stays together.
- Dress them up. Rowan always saw me getting my special running outfit on. So she'd want to get dressed up, too. Her outfit usually involved some necklaces and a sparkly shirts (I've included a picture of my 'personal trainer'). But getting her in the mood for a run always helped things.
- Bring them to your race! Rowan waited for me with her father at the finish line. I grabbed her right at the end and she finished the race with me. But as I was running, I saw whole families racing together. Some kids were in strollers. Some kids were walking. Next year, I'll run the whole thing with her one way or another. But even so, I'm glad that she was there at the end. And I know she was, too.
![]() |
| Me, my friend Mary, and Rowan post race |
| Rowan's Running Outfit |
| Fast Little Feet |
Happy running!
Tuesday, September 4, 2012
Water Games
Friday, August 31, 2012
Sand Castles
As summer winds down, some of us are heading to the shore to squeeze in a few last days at the beach. There is something magical about the ocean. It inspires your imagination, incites you to play, and sets you at ease all in one fell swoop. One of our favorite things to do at the beach is to build sand castles. And when we build sand castles, we like to make them BIG. After building one castle that Rowan could use for her dolls, she tried to climb in and use it herself. I thought to myself 'Self, what prevents me from making a sand castle so big that she can play in it, too?' And, from that day forth, we've made it a goal to out-do ourselves in the sand castle building department.
The most functional interactive sandcastle design that we've come across is to dig down into the sand (as opposed to focusing on building up) and create a bit of a bridge for Rowan to crawl under. This method creates two "rooms" on either side of the bridge that, if you make them wide enough, can be pretty great little hang-outs on their own. I don't think that you can see them very well in the pictures below, but we built small sand shelves, stairs and stools in each of the "rooms". One particular set of stairs collapsed, but we just turned them into a slide instead. The bridges themselves collapse from time to time, too. Whenever that happened to us, we would just turn each side of the bridge into a mountain, which I think Rowan liked just as much.
Rowan loved decorating the castle walls with little spires made out of drippy, muddy sand. We mix equal parts sand and water and drip the mud in little piles any place that needs a little decorating. We also enjoyed finding sea shells to adorn our fortresses. And, once in a while, we'd find a little crab and let him frolic in our castle.
Before you go off an try this yourself, here are a couple of pieces of advice. First of all, make sure to always keep an eye on your little one in the sand castle. It is sand, of course, and anything you build out of it will be temporary by nature. So make sure that you're with them all of the time (naturally). Second of all, it's easy to get wrapped up in your project. I mean, who doesn't feel like they're a kid again when they're playing in the sand? So enjoy! But make sure that they're having fun, too.
The most functional interactive sandcastle design that we've come across is to dig down into the sand (as opposed to focusing on building up) and create a bit of a bridge for Rowan to crawl under. This method creates two "rooms" on either side of the bridge that, if you make them wide enough, can be pretty great little hang-outs on their own. I don't think that you can see them very well in the pictures below, but we built small sand shelves, stairs and stools in each of the "rooms". One particular set of stairs collapsed, but we just turned them into a slide instead. The bridges themselves collapse from time to time, too. Whenever that happened to us, we would just turn each side of the bridge into a mountain, which I think Rowan liked just as much.
Rowan loved decorating the castle walls with little spires made out of drippy, muddy sand. We mix equal parts sand and water and drip the mud in little piles any place that needs a little decorating. We also enjoyed finding sea shells to adorn our fortresses. And, once in a while, we'd find a little crab and let him frolic in our castle.
Before you go off an try this yourself, here are a couple of pieces of advice. First of all, make sure to always keep an eye on your little one in the sand castle. It is sand, of course, and anything you build out of it will be temporary by nature. So make sure that you're with them all of the time (naturally). Second of all, it's easy to get wrapped up in your project. I mean, who doesn't feel like they're a kid again when they're playing in the sand? So enjoy! But make sure that they're having fun, too.
Tuesday, August 28, 2012
Shake Your Silly Illy Willies!
Big hugs and thanks to all the kiddos for their playful and sweet hearts who made this video such a blast to make, and to Scout for a fabulous production.
xo,
Yvonne and Lolly
Saturday, August 11, 2012
Kazoos! Make your own with toilet paper rolls.
For the last several months, we've been collecting empty toilet paper and paper towel rolls from friends and family. Thanks to everyone, we now have hundreds, and you might have noticed in our previous post for Olympic games that we used some as pretend torches. Well, we still had a ton left, so we decided to create musical instruments. I was a bit sceptical and not quite sure how well little ones would be at making the sound...but it was a huge success at our latest concert. We gave everyone a chance to color and construct their very own kazoos to play along with us. It's a super easy craft and a great way to recycle, too!
You will need:
- Toilet paper roll or paper towel roll sans paper
- Rubber band
- Wax paper
- Scissors
- Crayons or stickers to decorate
Directions:
- Decorate the toilet paper or paper towel roll
- Cut a small hole about 1 inch below the end of the roll. ( I used one part of a scissor and twisted it to make the hole).
- Cut a square piece of wax paper roughly 3.5" x 3.5" and place around the top of the roll (same side with the hole)
- Adjust the wax paper so the hole is not covered.
- Play! Hummmm or sing into it!
Subscribe to:
Posts (Atom)